As the mobile web has developed there is one thing that has largely gone unchanged. The checkout experience. Completing the checkout process on mobile devices is often a challenging task – especially if the website is not responsive. With shopping cart abandonment rates on mobile being reported as high as 97% this is a problem that cannot be ignored.
The checkout experience tends to follow a pretty standard procedure. The customer enters their billing and shipping details, then their credit card information, and finally they are sent to a page to confirm the order. Immediately we can see that there is a big area for improvement here. The customer has to input their billing, shipping and credit card details for every purchase they make across the web (unless the website has already saved this data for them). Why not give this task to the browser? Then all the customer has to do is check the details and confirm the order. This is exactly what requestAutocomplete aims to accomplish.
In this blog post you are going to learn about the benefits of using requestAutocomplete, and how to integrate this new browser feature into your websites.
Why requestAutocomplete is Awesome
Adding requestAutocomplete to your websites offers a number of benefits to both the store and the customer.
- Better User Experience – By cutting out the need to input data on a mobile device you are dramatically improving the checkout experience. This applies to the desktop environment too. Even with better input devices, no one is going to complain about having to do less typing.
- Less Abandoned Shopping Carts – A better checkout experience results in less abandoned shopping carts and more sales.
- Potential for Better Security –
requestAutocompletecurrently supports Google Wallet (in the US) for secure storage of your personal information. With plans to open this feature up to more payment providers in the future, customers will be able to shop using their preferred payment method.
Using the requestAutocomplete Method
requestAutocomplete is a new method that is being made available on <form> elements. It enables the browser to fill in forms with the user’s stored shipping, billing and credit card information. This method must be called in response to a direct user action such as a click or key press.
form.requestAutocomplete();
When the requestAutocomplete method is called, the browser will display a dialog to the customer allowing them to select the details they wish to use for the transaction.
Image may be NSFW.
Clik here to view.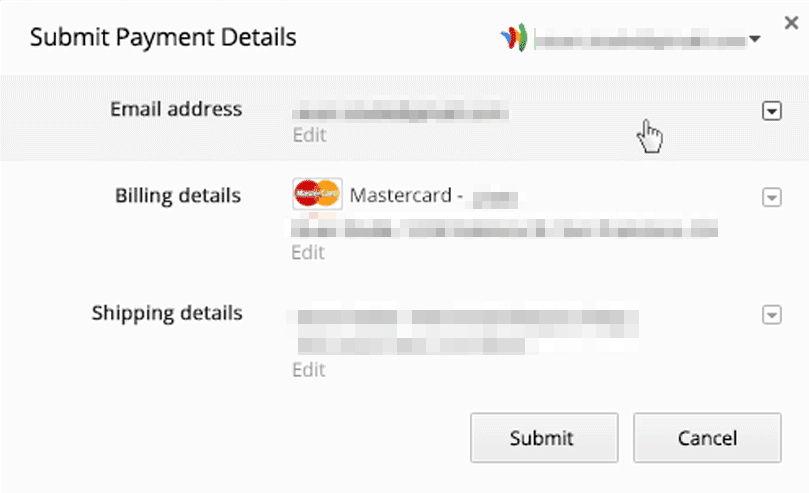
Once the customer has selected their details, the browser will attempt to enter the data into the form. You should note that the browser will try to obey any HTML5 validation that is present on the input elements. If the customer data doesn’t pass the validation an error will be thrown.
Autocomplete Attributes
The autocomplete attribute has been extended to tell the browser where it should place the various pieces of customer data. This attribute was previously used to enable or disable the browser’s built-in auto-fill feature. You use the autocomplete attribute on any form control, not just <input> elements.
<input type="text" name="email" autocomplete="email" required>
There are two sets of data that requestAutocomplete handles; credit card details and address details.
Credit Card Details
The credit card data set includes the following field types. These should be used as the value for the autocomplete attribute.
- cc-name – Cardholder Name
- cc-number – Card Number
- cc-exp-month – Card Expiration Month
- cc-exp-year – Card Expiration Year
- cc-csc – Card Security Code
<input type="text" name="cc-number" autocomplete="cc-number" required>
Note: You can set the form controls name attribute to whatever you like. I just find it easier to make this the same as the autocomplete value.
Address Details
The browser stores both the customer’s shipping and billing addresses. In order to access these details you need to specify both the address you want, and the address field. This is demonstrated below.
<input type="text" name="b-street-address" autocomplete="billing street-address">
Both the shipping and billing addresses have the following fields.
- name
- tel
- tel-country-code
- tel-national
- street-address
- locality
- region
- postal-code
- country
Autocomplete Events
The requestAutocomplete method is asynchronous. You therefore need to listen out for a couple of events to see if the request completes successfully. These events are fired on the form that requestAutocomplete has been called on.
autocomplete
The autocomplete event is fired if the customer’s details were successfully entered into the form. You then want to submit the form so that the customer is taken to a page where they can confirm the order.
form.addEventListener('autocomplete', function(e) {
  e.preventDefault();

  // Completed successfully, submit the form to go to the
  // confirmation page.
  form.submit();
});
autocompleteerror
If an error occurs that prevents requestAutocomplete from filling the form, the autocompleteerror event will be fired. This event will have a reason property that can be used to examine the cause of the error. There are three different reasons why requestAutocomplete might fail.
invalid– The customer’s data did not pass the HTML5 form validation.cancel– The user clicked cancel on the dialog.disabled– The browser supports requestAutocomplete, but it’s disabled in browser preferences, or the method was not called in response to a user action (click, key press, etc).
form.addEventListener('autocompleteerror', function(e) {
  if (event.reason == 'invalid') {
    // Data did not pass validation.
  } else if (event.reason == 'cancel') {
    // Customer cancelled the dialog.
  } else if (event.reason == 'disabled') {
    // Either requestAutocomplete is disabled in browser preferences
    // or a user action did not trigger the method call.
  }
});
Implementing requestAutocomplete in Your Checkout Flow.
Now that you have an understanding of how to use requestAutocomplete lets see how you could integrate this new feature into your checkout flow.
Image may be NSFW.
Clik here to view.
This diagram shows an example checkout flow that uses requestAutocomplete to reduce the number of actions required from the customer. By ‘hijacking’ the initial checkout button, we can eliminate the need to show customers the address and credit card forms all together. Of course, you will want to provide the ability for customers to update this data should they need to.
Here is an example of how to handle the checkout button on the shopping cart page.
// Get the form and checkout button.
var form = document.getElementById('checkout-form');
var checkoutBtn = document.getElementById('checkout-btn');

// Add an event listener for when the checkout button is clicked.
checkoutBtn.addEventListener('click', function(e) {
  e.preventDefault();

  // Check for requestAutocomplete support.
  if (form.requestAutocomplete) {
    // We are go for launch, request the payment and shipping details.
    form.requestAutocomplete();
  } else {
    // No support, redirect to the old school checkout page.
    window.location = '/checkout/';
  }
});
For this to work the address and credit card forms would need to be present on the shopping cart page. These could be hidden using CSS.
Browser Support for requestAutocomplete
Browser support for requestAutocomplete is pretty limited. Google Chrome is the only browser that includes an implementation of requestAutocomplete. This is to be expected as the Chrome team originally proposed this new feature.
Other browser vendors are discussing the possibility of implementing requestAutocomplete in the future.
If implemented correctly, requestAutocomplete will not break the checkout flow if the customer is using a browser without support for this feature.
How Secure is requestAutocomplete?
Naturally, security concerns arise whenever it comes to handling or storing sensitive information. Lets take a look at a couple of security considerations that affect requestAutocomplete.
Data Storage
Data fulfilled using requestAutocomplete can be stored in a few different ways. Chrome users can currently use Google Wallet to safely store their sensitive information. However, this is currently only available to US users. Google Wallet has a security feature called One-Time Virtual Cards that prevents your real credit card information from being sent to the store.
The second option is to bypass a payment provider and store your information with the browser. With this option you’re trusting that the browser will store your data securely.
Serve Pages Using SSL
The requestAutocomplete method should be called on a page served using SSL. If it is not, the customer will see a message warning them that the site is insecure.
Final Thoughts
The current checkout experience on mobile is broken and requestAutocomplete aims to fix that. In this blog post you have learned how to integrate requestAutocomplete into your own websites. You’ve also spent some time looking into the benefits of this new browser feature and the security considerations that you should think about both as a store owner and a customer.
I’m really excited to watch how requestAutocomplete develops over the next few years. I hope to see more browser vendors adopting this feature to create a better checkout experience for the mobile web (and beyond).
Useful Links
- Chromium Docs: Using requestAutocomplete()
- requestAutocomplete – take my money, not my time
- Standardizing Payments on the Web: Introducing requestAutocomplete()
The post Creating a Better Checkout Experience with requestAutocomplete appeared first on Treehouse Blog.